
One of the big reasons for Acumatica’s popularity is the customization engine that allows you to tailor the Acumatica Cloud ERP software to meet the specific needs of your business.
Customizing Acumatica has become increasingly popular, especially as Acumatica continues to introduce additional no-code / low-code capabilities.
You deploy an Acumatica customization using something called a Customization Project.
A Customization Project can handle anything from very small customizations, like moving a field or adding a side panel, to very large customizations, like building new screens or entire modules (eg. Manufacturing before it was acquired by Acumatica).
If you want to dive into the gory details of Customizations Projects, checkout the developer courses on Acumatica University.
If you want a simple explanation of how to publish a Customization Project, keep reading.
Before we get into publishing a Customization Project, I have 4 simple rules that I like to follow:
1. Publish the Customization Project after hours
Customization Projects should be published after hours, when no one is using Acumatica. This is because your customization might modify a screen that someone is in the middle of using. If someone is using a screen and a customization to that screen gets deployed in the middle of them performing an action, it could lead to unpredictable results.
Is that scenario likely to happen? Probably not. So, if you like living dangerously, you can skip Rule #1, but I personally like to follow it.
2. Pick one person to deploy Customization Projects
Managing Customization Projects can get tricky because they are the vehicle for delivering all customizations in Acumatica, whether it’s a simple customization done by a Business Analyst through the Acumatica web interface or a complicated customization done by a hardcore Developer using Microsoft Visual Studio with thousands of lines of C# code.
Since both Business Analysts and Developers have to deploy their customizations in the same place, it’s important to pick 1 person who is responsible for deploying Customization Projects to your Production environment. This person becomes the gatekeeper who is aware of all customizations and when each one was deployed.
Because of Rule #1, pick someone who doesn’t mind staying after hours or working from home 🙂
3. Deploy from your Production Instance
If you don’t follow Rule #3, you can create a big mess.
When you import a Customization Project .zip file into the Customization Projects (SM204505) screen, Acumatica stores the definition of the customization in the Tenant that you are in so you no longer need the .zip file.
But what if you have multiple Tenants? Maybe a Production Tenant and a Testing Tenant like I have in the screenshots below. Well, if you aren’t aware of this rule, you might import one Customization Project into Production and another into Testing. Then you’d be able to publish one Customization Project at a time, but not both. That’s a problem.
To create an even bigger problem, if you import the first version of the Customization Project into Production and the second version of the same Customization Project into Testing, you’ll be very confused. Since both Customization Projects have the same name, which one is most recent? Imagine doing this with multiple Customization Projects and you could wind up with Production having the most recent version for some Customization Projects and Testing having the most recent version for other Customization Projects. What a headache!
So I recommend deleting Customization Projects from all Tenants except for your Production Tenant. Then you know that the Production Tenant houses all of your Customization Projects.
When you copy a Tenant into a new Tenant or restore a snapshot of a Tenant into a new Tenant, keep in mind that the Customization Projects will come over to the new Tenant. I think it’s best to delete them in the new Tenant right away before you forget.
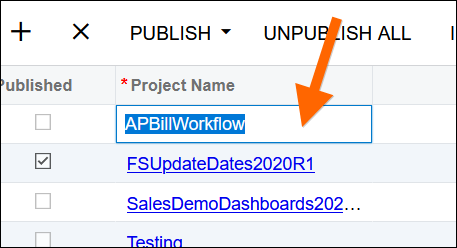
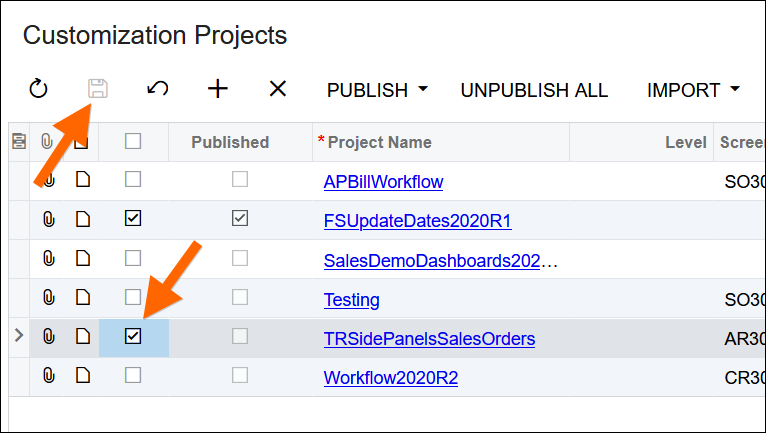
The trouble is that Acumatica won’t let you delete a Customization Project in a Tenant if it thinks that Customization Project is published. Rather than waste time unpublishing, you can get around this by renaming all published Customization Projects to a unique name by clicking the whitespace in the Project Name column, then changing the name and saving as shown in the following two screenshots, then Acumatica should allow you to delete the Customization Projects.:

4. Publish to all Tenants on the Instance
Acumatica purists might disagree with me on this rule, but I think it’s a good rule to follow.
The Acumatica Instance is the URL that you use to access Acumatica. The Acumatica Tenant is the drop-down that you pick when you login and that you see in the upper-right after you login.

In theory, you can create customizations that only effect one Tenant.
In practice, I think it’s best to think of every customization as affecting all Tenants on an Instance because it’s very difficult to know whether a customization affects one Tenant or all Tenants.
You’ll see below that I have you publish the Customization Project to all Tenants.
Note that this Rule #4 doesn’t violate Rule #3. Publishing a Customization Project to another Tenant does not copy the Customization Project definitions to that other Tenant so your Customization Projects (SM204505) screen will still be empty in all Tenants except for your Production Tenant if you follow Rule #3 and Rule #4. You can still keep all of your Customization Project definitions stored in your Production Tenant, then do all of your Customization Project publishing from your Production Tenant.
Publishing the Acumatica Customization Project
When someone gives you an Acumatica Customization Project to publish, it will be a .zip file like this:

To publish this Customization Project, we first need to go into the Customization Projects (SM204505) screen in Acumatica.
You can see on my Customization Projects (SM204505) screen that I have one Customization Project that is published which you can see by the read-only checkbox in the Published column:

We need to import our Customization Project which we do by clicking the IMPORT button and selecting the .zip file:


Now that the Customization Project has been imported, we need to select it and Save. Acumatica will publish all Customization Projects that are checked in the first column. I want to keep all existing published Customization Projects so I don’t want to uncheck the FSUpdateDates2020R1 Customization Project in the screenshot below or it will get unpublished.
Since we want to publish to all of our Tenants, we need to click the down arrow next to the PUBLISH button and then click Publish to Multiple Tenants. In the popup window, check each Tenant (I have a Production Tenant and a Testing Tenant in my screenshot below). Clicking OK will start the Customization Project validation process in a pop-up window.


When the pop-up window comes up, you’ll see a bunch text get printed on the screen. This is Acumatica validating the Customization Project. When it’s done you’ll see a green line that says “Validation finished successfully.” Once you see that green line in the screenshot below, you can click the Publish button in the screenshot below which will do the actual publishing of the Customization Project. In the past, I have tried publishing while people are logged in and I didn’t experience the Warning about active website users being logged out so I’m not sure if it’s true, but nowadays I try to stick to Rule #1 above and make sure that the publishing is done after hours.

Once the Customization Project has been published, you’ll see another green line which this time will say “Website updated.” as you can see in the screenshot below. Once you see this, you can close the pop-up window.

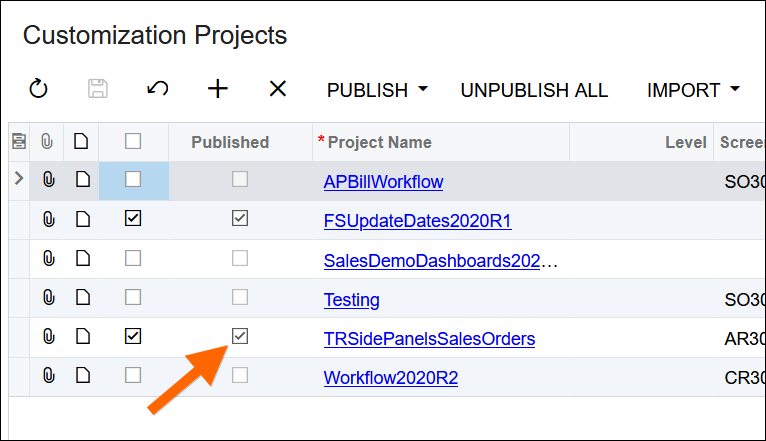
After you close the pop-up window, the screen will refresh. This can take a while, depending on how many Customization Projects you have published, so don’t panic if it takes a couple of minutes. Once the screen refreshes, you should see the checkbox in the Published column for the Customization Project that you just published.
Re-Publishing the Acumatica Customization Project
Many times, after you publish the Customization Project, you discover things that need to be fixed or you decide to make further enhancements. When you do that, the developer hands you back another Customization Project with the changes, but the Customization Project has the same name.
How do you re-publish a new version of the same Customization Project that you already published?
Note: I should point out that, if you open a Customization Project by clicking on the hyperlink, there is an option called File -> Replace from Package that allows you to replace the existing Customization Project with a new Customization Project. But I personally don’t trust this option.
I prefer to unpublish the Customization Project, delete it, then re-publish it. That way I’m confident that I’m eliminating the old Customization Project and replacing it with the new Customization Project.
To unpublish the Customization Project, first uncheck the checkbox in the first column for that Customization Project, then save:

Then follow the same publishing steps that we did in the Publishing the Acumatica Customization Project section above, but skip the Import part and start with PUBLISH -> Publish to Multiple Tenants. Since Acumatica only publishes Customization Projects that are checked, it will unpublish any Customization Projects that are not checked.
Once you are finished, you should see that your Customization Project no longer has the checkbox in the Published column:
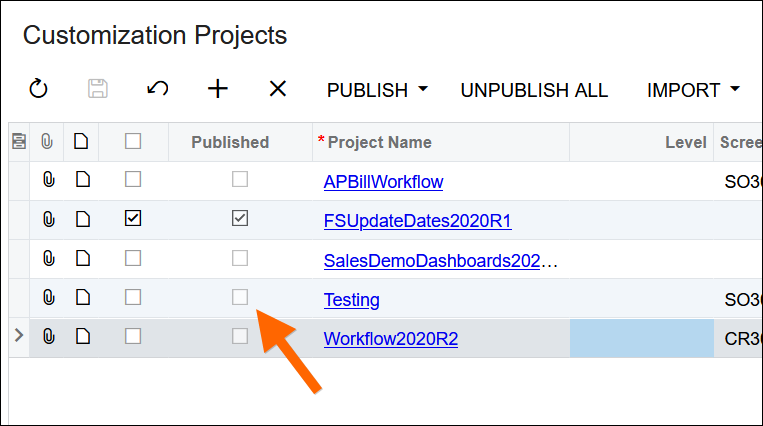
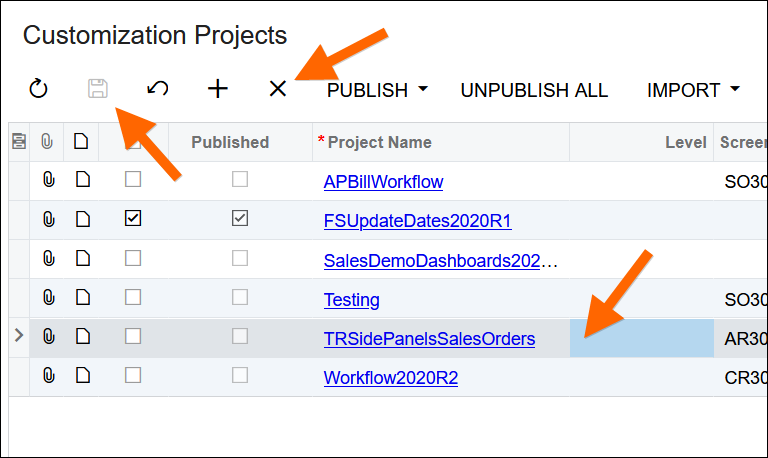
Now that it’s unpublished, you can delete the Customization Project by clicking on the row and using the X button, then the Save button:
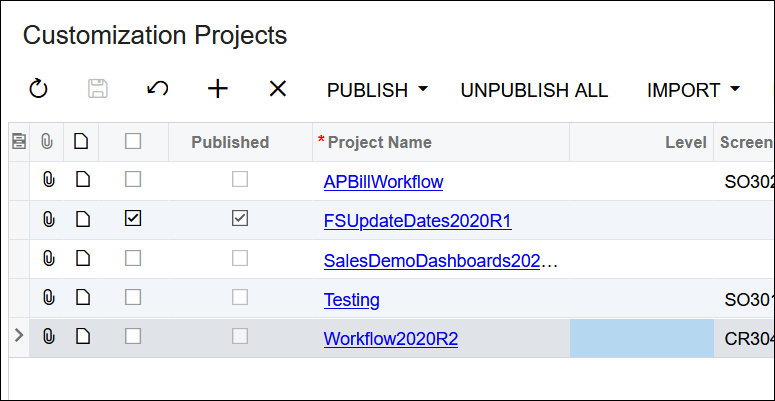
Once you do that, the Customization Project should be gone:
Now you can follow the steps in the Publishing the Acumatica Customization Project section above, but import the new .zip file rather than the old .zip file.
This is how you can re-publish the Customization Project.