Before I paste in my notes from this session, I wanted to give a little back story.
Personally, I think that Microsoft Flow is one of the big reasons why Dynamics 365 is appealing to people. Having the ability to introduce custom workflow without having to do a ton of coding in Visual Studio is indeed very appealing. But if Acumatica can also work with Microsoft Flow, that takes a lot away from Dynamics 365.
I was actually using Microsoft Flow to create AP Bills from an email. The idea was to create a “poor man’s” AP Workflow where you would point your copier/scanner to an email address. And I had it working too. I wrote all the JSON and got all of the Flow steps working. Then I patted myself on the back, feeling proud of myself. Note: There is no way that I would have gotten it working without this session from Gabriel, this session from Samuel, and this blog post from Sergey.
Then, I went to show my “poor man’s” AP Workflow to a prospect on November 6th, 2017. I had tested it the week before, but I tested again in the morning before the demo to make sure it worked. But it didn’t. What happened?
According to the Flow Release notes, there was a new release on November 2nd, 2017. I checked with Samuel from Acumatica and his Flows weren’t working either. So Microsoft did something on November 2nd, 2017 that broke our Flows. Boo hoo 🙁
If you’re interested in all the technical details as to why it broke, I put a comment on the second page of this Microsoft forum thread (click here). Bottom line, apparently it was never officially supported.
Needless to say, I was sad that Flow no longer worked with Acumatica.
But then I attended this session at Acumatica Summit 2018 and learned that there is a way to use OAuth authentication instead of Cookies. And OAuth is supported by Microsoft Flow.
Now I’m happy again.
One more thing. There are two other posts out there on this subject so I want to include the links here in case you want to do further research:
- https://stackoverflow.com/questions/47314071/using-acumatica-rest-api-with-microsoft-flow/47315998
- http://asiablog.acumatica.com/2016/12/acumatica-and-microsoft-flow.html
https://twitter.com/TimRodman/status/958052984633610241
https://twitter.com/TimRodman/status/958053444908191744
https://twitter.com/TimRodman/status/958053900392812544
https://twitter.com/TimRodman/status/958053928238747649
https://twitter.com/TimRodman/status/958054141766569986
https://twitter.com/TimRodman/status/958054372101054464
https://twitter.com/TimRodman/status/958055445062651904
https://twitter.com/TimRodman/status/958055557814018048
https://twitter.com/TimRodman/status/958055800399978497
https://twitter.com/TimRodman/status/958055919098744834
https://twitter.com/TimRodman/status/958056842852257792
https://twitter.com/TimRodman/status/958057473897791488
https://twitter.com/TimRodman/status/958057683973738498
https://twitter.com/TimRodman/status/958057910579466240
https://twitter.com/TimRodman/status/958058557118861313
https://twitter.com/TimRodman/status/958059736276131842
https://twitter.com/TimRodman/status/958060404445466625
https://twitter.com/TimRodman/status/958060676135768064
https://twitter.com/TimRodman/status/958061557560369153
https://twitter.com/TimRodman/status/958061966706266113
https://twitter.com/TimRodman/status/958062529321848833
https://twitter.com/TimRodman/status/958063565201641472
https://twitter.com/TimRodman/status/958064190551453698
https://twitter.com/TimRodman/status/958064752663715840
https://twitter.com/TimRodman/status/958067131245088768
https://twitter.com/TimRodman/status/958067652064407552
https://twitter.com/TimRodman/status/958068026066329606
https://twitter.com/TimRodman/status/958069721932365824
https://twitter.com/TimRodman/status/958070436763439106
https://twitter.com/TimRodman/status/958070600215523334
https://twitter.com/TimRodman/status/958070811407147015
https://twitter.com/TimRodman/status/958070965073825792
Update 11/19/2018: Ok, so I finally did this in a demo environment and thought I’d write down my notes here on how I did it:
1. In the Connected Applications (SM303010) screen, I filled out the Client Name and OAuth 2.0 Flow fields like this (screenshot taken after pressing Save so Client ID is displayed):

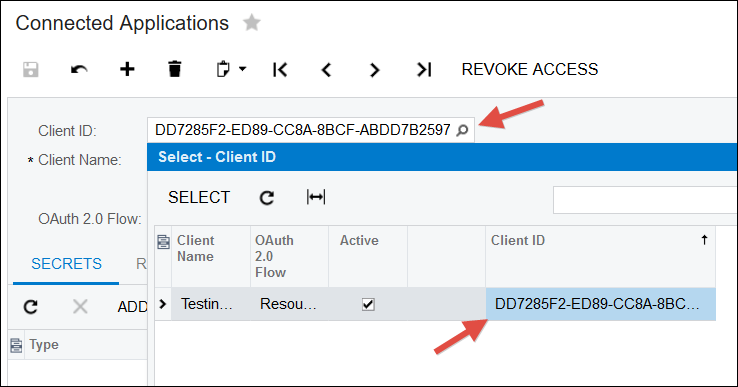
2. Take the Client ID and copy it to Notepad or somewhere safe. You can’t copy from the field, but you can copy it from the window that appears when you click the magnifying glass:

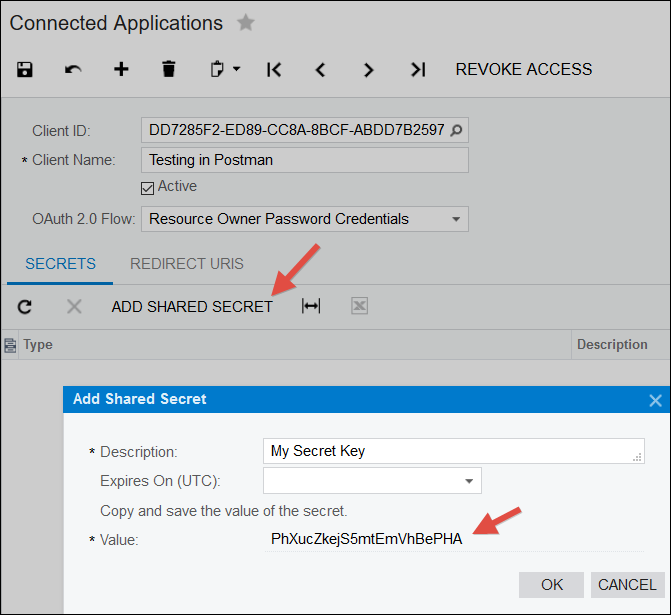
3. Click the ADD SHARED SECRET button, give it a Description, and copy the Value to Notepad or somewhere safe. This is your Client Secret. You have to copy it here because you can’t go back in later to display it. Don’t forget to click the Save icon after clicking OK.

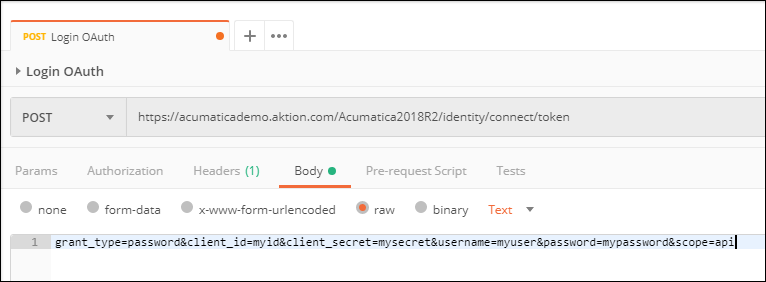
4. Setup Postman to look like this (showing Headers and Body tabs):
application/x-www-form-urlencoded
grant_type=password&client_id=myid&client_secret=mysecret&username=myuser&password=mypassword&scope=api


5. Replace myid and mysecret with the Client ID and Client Secret that you pasted out to Notepad (or somewhere safe) earlier. Note that what you put in the myid field has the Tenant ID after the @ symbol.
6. Replace myuser and mypassword with your regular Acumatica username and password. This part is really weird to me. I think you should tie the Client ID and Client Secret to a user the Connected Applications (SM303010) screen rather than pass them here, but for some reason it doesn’t work that way.
7. Here is what Postman looks like for me (minus my top secret username and password):

8. When you click the SEND button in Postman, you will get back access_token, expires_in, and token_type (take note of the access_token):

9. Now do a new tab in Postman and let’s try to get back some info about a Sales Order. Take the access_token from earlier and put it on the Headers tab in the Value column after “Bearer “. When you click SEND you should get information about the Sales Order.
