This week I was reviewing the security options in Acumatica and I was pleased to discover that Acumatica offers field-level security on screens.
Sometimes it’s nice to be able to control which fields on a screen a user has access to. Maybe you want to allow the Sales department to control pricing and sales categories for a stock item in the Stock Items (IN202500) screen, but you want the Inventory department to control the warehouse details and the Shipping department to control the Packaging information. All of this information lives on the Stock Items (IN202500) screen so you wouldn’t want to grant permissions for everything on the screen to Sales, Inventory, and Shipping. This is where field-level security comes in handy. You can allow only specific fields to be edited by Sales, other fields to be edited by Inventory, and other fields to be edited by Shipping. You could still display all fields as read-only or maybe hide some fields if they contain sensitive information. And this can be done on any screen, not just the Stock Items (IN202500) screen.
My company’s current ERP system, Sage 500 ERP, only offers screen-level security. Because of this, I have had to create Microsoft Access applications in order to create more restricted screens for certain users. It gets the job done, but it’s very messy and it opens up some small security holes in the Sage 500 ERP application.
In this post I’d like to cover how to restrict the Vendors (AP303000) screen to only allow a user to modify the Vendor’s main address. This could be useful if you want to allow the Purchasing department to maintain the vendor’s main address without allowing them to change any other information on the vendor.
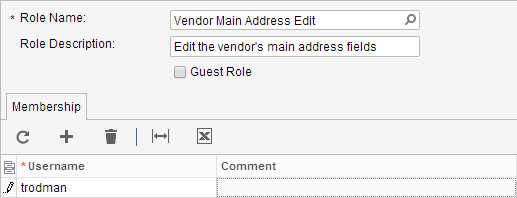
In order to setup security for a User, you first need to define a Role, assign the User to that Role, then define the security permissions for the Role. In order to create the Role, use the User Roles (SM201005) screen. Here I am going to created a Role called Vendor Main Address Edit and assign my trodman User to it.
Once you create the Role, you can define security for the Role using the Access Rights By Role (SM201025) screen. You could assign permissions of Not Set, Revoked, View Only, Edit, Insert, and Delete. Insert could come in very hand for a group of users who should be able to create new records, but not modify them. In this example though, I’m going to assign Edit permissions on the entire Vendors (AP303000) screen like this.
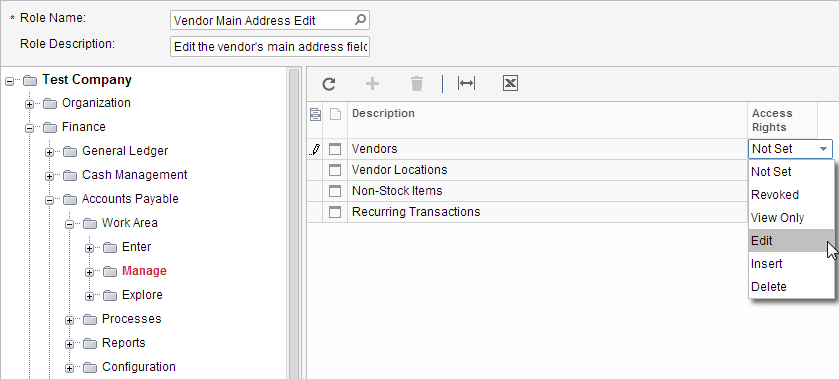
Now that I have given Edit permissions on the entire screen, I now want to lock down all the fields, except for the address fields. Notice that the Vendors (AP303000) screen is broken down into multiple categories and the fields are listed under each category. You have to double-click in the grid to begin selecting Access Rights for each category. You can choose from Inherited, Revoked, View Only, and Edit. I prefer to sort my grid by the Description field first, then assign permissions. By default, all the permissions are set to Inherited which means it will inherit its permissions from the next level up. In our example, I’m going to start by changing the permissions on all the categories from the default of Inherited to Revoked.

Once I have set permissions on all the categories to Revoked, I now want to set permissions on all the fields within each category to Revoked.

If anyone knows of an easy way to assign the permission of Revoked to all fields quickly, please let me know. The fastest way I know is to type the letter “r” on the keyboard, then press the “Enter” key twice in order to move to the next field down on the list. Then type “r” again, and continue the same pattern. It’s pretty fast since you don’t have to touch your mouse.
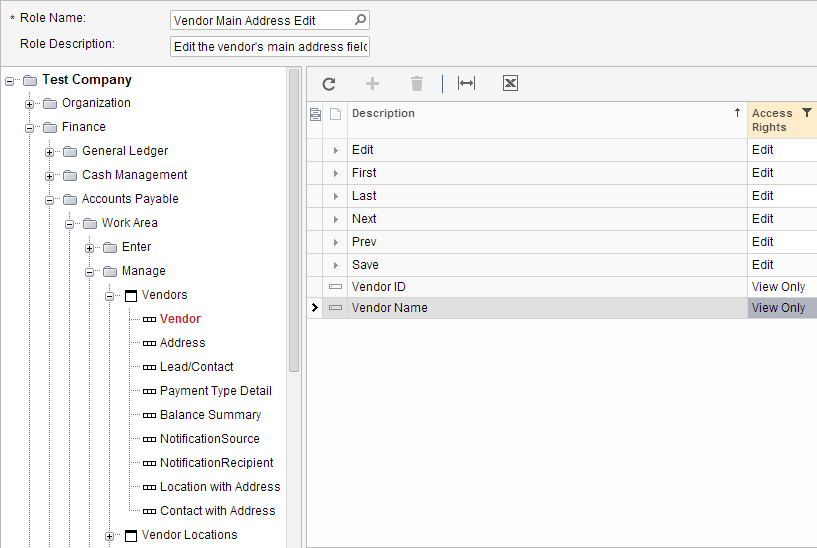
Once I’ve assigned Revoked to all the categories and all the fields in each category under the Vendors (AP303000) screen, I can now go back and assign Edit to the Address category and Edit to the fields within the Address category that I want the user to be able to edit.


Now for my favorite part. I can easily login as my trodman user by opening another tab in my Google Chrome web browser. I don’t need a separate computer or a separate browser in order to test, just simply another tab on my current browser. Somehow, Acumatica is able to have multiple users logged in simultaneously on multiple tabs of a web browser on the same computer. Another really nice feature is that the user picks up the new permissions simply by refreshing the webpage. You don’t need to logout and then back in like you do in Sage 500 ERP in order to pickup the new permissions. Now, when I login as my trodman user on a separate tab, this is what I see:

Hmmm, something doesn’t look right. Even though I have permissions to the Vendors (AP303000) screen, I can’t see the screen listed on the menu. But, since I’m able to be logged in as two different users on two different tabs of my web browser, I don’t have to logout and then back in as the admin user. I just click over to the tab that is logged in as admin and still has the Access Rights By Role (SM201025) screen open to make my security changes. I’m going to grant View Only permissions on the Finance module.

Then View Only to Accounts Payable:

Now I can click back over to the tab that is logged in as trodman and refresh my page by pressing Ctrl-r on my keyboard. Here is what the screen now looks like:

This is much better. I’m able to browse to the Vendors (AP303000) screen and I’m able to see the address fields. I still have a problem though because I don’t have any buttons available on the screen to select a vendor or save my changes. So, I need to set a few more permissions under the Vendor category and set the permissions on the Vendor category itself to Edit. In order to speed this example up, I’m going to set the permissions on the fields under the Vendor category, then filter the grid to only show which fields are no longer set to Revoked.
Now I can switch back to the trodman user and notice that this looks pretty good. I’m able to lookup based on the Vendor ID field and I can use the buttons on the top to browse through vendors or save my changes. And the trodman vendor can only make changes to the address fields which is exactly what I wanted.

So, as you can see, this is MUCH faster than having to use a program like Microsoft Access to develop a new screen. Also, this method has the BIG advantage of keeping all of our security setup inside of the ERP application. This becomes even more crucial as you use this method on more screens.