Update June 22nd, 2017: If you’re using Acumatica, you used to have to manually paste your Timesheet data field by field into the Acumatica screen. Thankfully, beginning in Acumatica Build 6.10.0680, you can now upload into the screen from Excel. That makes A Power BI Timesheet an even more pleasant experience for Acumatica users.
If you work for a law firm, an accounting firm, or any consulting firm, then chances are you have to fill out a timesheet. And one of the most important things on that timesheet is whether or not your time was billable.
Now, personally, I’m not a fan of timesheets. In fact, I agree with Ed Kless from the VeraSage Institute that people who use timesheets are actually practicing Communists. If that sounds interesting to you, you’ll love hearing Ed explain why he wants to eliminate timesheets in professional organizations: click here, scroll to the 20:18 mark and listen to the end (if you’re hooked, listen to part 2).
But for those of you who still have to do timesheets, I feel your pain. So much so, that I came up with a way to make your life easier by using Power BI and Microsoft Exchange with Office 365.
Basically, you can keep your timesheet in Microsoft Outlook and then use Power BI to analyze it and output it to a format that can be imported into whatever terrible timesheet program your company forces you to use.
Office 365 Email
Luckily, many companies are using Office 365 now for their email. If yours isn’t, then I think this method will also work with regular Exchange, but I haven’t actually tested it.
Office 365 is so affordable and so reliable that, frankly, I’m not sure why everyone isn’t using. I guess some still prefer to host with “Joe’s hosting service” or run email through a computer sitting in someone’s basement. If it’s good enough for Hillary Clinton right? Well, that’s just plain silly in my opinion. No way “Joe’s hosting service” can do a better job than an entire team of professionals at Microsoft.
So hopefully your company realizes this and runs email on Office 365.
Then you can keep your Timesheet in your Outlook Calendar and have Power BI read from it.
Power BI
Power BI has the ability to connect to Office 365 and read the Calendar, Mail, Meeting Requests, People, and Tasks stored in your Office 365 account.
We just need to read from the Calendar for a Power BI Timesheet, but you can imagine the possibilities if you use Power BI to do other things like analyze your email or build an org chart.
Since Power BI is really good at grabbing data, transforming it, and modeling it, it’s a great tool to use for analyzing how you spend your time.
Also, since it can display data in a variety of different ways, you can output the timesheet data into a format that can be imported into a timesheet program.
A Power BI Timesheet
If you want to try keeping your timesheet in Outlook and analyzing it with Power BI, just follow these instructions.
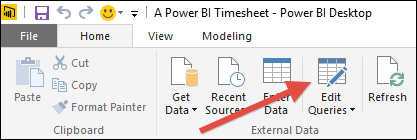
1. Download and Install Power BI Desktop
Click here to download and install Power BI Desktop. It’s free.
Not sure what Power BI Desktop is? Then read this

2. Download A Power BI Timesheet.pbix and Open It

3. Change the Email Address
Click Home -> Edit Queries to pull up the data sources that feed the file

Click View -> Advanced Editor to see the code behind the data sources

Find myemail@mycompany.com and change it to your work email address, then click Done

Click Home -> Close & Apply

4. Connect to your calendar
Click Refresh

Then enter your Password and click Connect

It will think for a little bit, but then it should bring in data from your calendar.
Reports included in A Power BI Timesheet
There are several tabs included in the A Power BI Timesheet.pbix file.
Here is a screenshot of each with some explanations. Click any image below to see the full size image.
Note: The first screenshot is from my Outlook calendar and it is the sample data from May 2017 that was used to populate A Power BI Timesheet.pbix with the data used in the screenshots that follow.


More Information
Here is some more information about the A Power BI Timesheet.pbix file.
- The sample data shown in the screenshots above is actually included in the A Power BI Timesheet.pbix file, but you won’t see it unless you set your Current Week to May 22nd 2017 – May 26th 2017.
- The Current Week is determined by the system date on your computer. You can change the Current Week by simple changing your system date and then refreshing the A Power BI Timesheet.pbix file.
- Dashes in your Calendar Events are used to separate the Client and the Event Description. So, “Client A – Conducting Training” gets broken into two columns with “Client A” landing in the Client column and “Conducting Training” landing in the Description column
- The 3 “Current” tabs above all look at the current week
- The 3 “Future” tabs above all look at the 90 days following the current week
- The following calendar events are filtered out and are not brought into Power BI
- Show As is set to Free or Out of Office
- Recurring Events
- The Start Date and End Date on an Event are not the same date
- The Tables in the Power BI data model are:
- Calendar – Holds all of your Outlook calendar data
- Clients Projects – A mapping table that you manually maintain which maps Client to Project for Timesheet generation purposes
- Dates – A dynamically generated table based on the earliest and latest date in the Calendar table (makes it easier to slice and dice by Day, Week, etc.)
- The Measures in the Power BI data model are:
- % Bill – Utilization percentage using a base of 8 hours for a day or 40 hours for a week
- % Total – Total hours worked as a percentage using a base of 8 hours for a day or 40 hours for a week
- Bill – Billable hours
- Total – Total hours worked
- Of course, since this is Power BI, you can basically change anything you want and customize it to fit your specific needs
- For example, if you want to change the list of Clients/Projects, you can do the following:

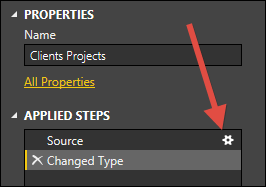

- For example, if you want to change the list of Clients/Projects, you can do the following:
The Gory Details
In case you are interested, here is the M code that gets used in the A Power BI Timesheet.pbix file.
let

Source = Exchange.Contents("myemail@mycompany.com"),

Calendar1 = Source{[Name="Calendar"]}[Data],

#"Inserted End of Week" = Table.AddColumn(Calendar1, "Week", each Date.EndOfWeek([End]), type datetime),

#"Changed Type3" = Table.TransformColumnTypes(#"Inserted End of Week",{{"Week", type date}}),

#"Filtered Rows1" = Table.SelectRows(#"Changed Type3", each Date.IsInNextNDays([Week], 90)),

#"Expanded Attributes" = Table.ExpandRecordColumn(#"Filtered Rows1", "Attributes", {"AppointmentType"}, {"Attributes.AppointmentType"}),

#"Filtered Rows" = Table.SelectRows(#"Expanded Attributes", each [LegacyFreeBusyStatus] <> "Free" and [LegacyFreeBusyStatus] <> "OOF" and [Attributes.AppointmentType] = "Single"),

#"Removed Columns" = Table.RemoveColumns(#"Filtered Rows",{"Folder Path", "Location", "DisplayTo", "DisplayCc", "RequiredAttendees", "OptionalAttendees", "IsAllDayEvent", "LegacyFreeBusyStatus", "IsReminderSet", "ReminderMinutesBeforeStart", "Importance", "HasAttachments", "Attachments", "Preview", "Id", "Body", "Attributes.AppointmentType", "Categories"}),

#"Inserted Date Subtraction" = Table.AddColumn(#"Removed Columns", "DateDifference", each Duration.Days([Start] - [End]), Int64.Type),

#"Filtered Rows3" = Table.SelectRows(#"Inserted Date Subtraction", each [DateDifference] = 0),

#"Removed Columns4" = Table.RemoveColumns(#"Filtered Rows3",{"DateDifference"}),

#"Inserted Time Subtraction" = Table.AddColumn(#"Removed Columns4", "Minutes", each [End] - [Start], type duration),

#"Inserted Date" = Table.AddColumn(#"Inserted Time Subtraction", "Date", each DateTime.Date([End]), type date),

#"Calculated Total Minutes" = Table.TransformColumns(#"Inserted Date",{{"Minutes", Duration.TotalMinutes}}),

#"Added Custom" = Table.AddColumn(#"Calculated Total Minutes", "Hours", each [Minutes]/60),

#"Removed Columns1" = Table.RemoveColumns(#"Added Custom",{"Start", "End", "Minutes"}),

#"Sorted Rows" = Table.Sort(#"Removed Columns1",{{"Date", Order.Ascending}}),

#"Changed Type" = Table.TransformColumnTypes(#"Sorted Rows",{{"Hours", type number}}),

#"Added Custom3" = Table.AddColumn(#"Changed Type", "Timesheet", each [Subject]),

#"Split Column by Delimiter" = Table.SplitColumn(#"Added Custom3","Subject",Splitter.SplitTextByEachDelimiter({" - "}, QuoteStyle.Csv, false),{"Subject.1", "Subject.2"}),

#"Changed Type1" = Table.TransformColumnTypes(#"Split Column by Delimiter",{{"Subject.1", type text}, {"Subject.2", type text}}),

#"Added Custom1" = Table.AddColumn(#"Changed Type1", "Description", each if [Subject.2] = null then [Subject.1] else [Subject.2]),

#"Added Custom2" = Table.AddColumn(#"Added Custom1", "Client", each if [Subject.2] <> null then [Subject.1] else null),

#"Replaced Value" = Table.ReplaceValue(#"Added Custom2",null,"Z Overhead",Replacer.ReplaceValue,{"Client"}),

#"Removed Columns2" = Table.RemoveColumns(#"Replaced Value",{"Subject.1", "Subject.2"}),

#"Reordered Columns" = Table.ReorderColumns(#"Removed Columns2",{"Date", "Client", "Description", "Hours", "Timesheet"}),

#"Changed Type2" = Table.TransformColumnTypes(#"Reordered Columns",{{"Description", type text}, {"Timesheet", type text}}),

#"Sorted Rows1" = Table.Sort(#"Changed Type2",{{"Date", Order.Ascending}})

in

#"Sorted Rows1"
Hi tim. I’m also working for make a Dashboard with my different meeting (for know, hour by hour, if i’m busy or not)
When i load the data from my meeting, i have all the meeting =» even the cancel meeting. If I change the subject of one meeting, I load the twos meetings (one per different subject)
But I do not find which can i detect the cancel meeting or the last update? Could you help me please
Best Regards
Hi Vincent,
When you cancel a meeting, does it get removed from your Outlook calendar, but the Power BI Desktop file is still picking it up?
Hi Tim,
A great solution! Do you know of any good way to get the data for the whole organization? Or we need to do a number of queries for everyone?
Hi Dimitar,
Hmmm, I haven’t looked into that idea. When I connect with my Office 365 credentials, I only see my data, but I wonder if connecting with an admin user would maybe show you more stuff.
Very Cool!
Just one question
How do I update the clients projects table to reflect my own clients /projects
currently its all Client A etc
Thanks
Great question. I just added a bullet point directly above “The Gory Details” section. Does that give you what you need?